The warm chocolate chips melted between my fingers as I broke off a corner of the still-steaming banana bread. That first bite—where the sweetness of overripe bananas meets the rich decadence of dark chocolate—transported me straight back to my grandmother’s kitchen, where I first learned that the secret to exceptional chocolate chip and banana bread isn’t just in the ingredients, but in the patience of letting those bananas ripen until they’re practically black.
After years of testing (and plenty of delicious failures), I’ve finally perfected a recipe that balances moisture and structure, sweetness and depth. This isn’t just another quick bread—it’s the recipe I reach for when friends drop by unexpectedly, when someone needs comforting, or when I simply want my kitchen to smell like heaven on a Sunday morning.
Whether you’re a seasoned baker or trying your hand at homemade bread for the first time, this recipe walks the perfect line between foolproof and impressive. The best part? Those spotty bananas you were about to toss are exactly what you need to make this magic happen.
Why You Should Make This Chocolate Chip Banana Bread
Let’s be honest—we’ve all experienced the guilt of watching perfectly good bananas turn brown on the counter. This recipe transforms that potential food waste into something magical. According to a recent food waste study, the average American household tosses about 40% of their fresh produce, with bananas topping the list. This quick bread recipe isn’t just delicious; it’s a practical solution to a common kitchen dilemma that saves you money and reduces waste.
While store-bought banana bread often contains preservatives and excessive sugar, this homemade version gives you complete control over the ingredients. You likely have everything you need already in your pantry, making this a budget-friendly option that costs roughly 75% less than bakery versions. The prep work takes just 15 minutes of active time, and the heavenly aroma that fills your home as it bakes? That’s the kind of atmosphere no scented candle can replicate—trust me, I’ve tried!
What truly makes this recipe special is its versatility. My seven-year-old nephew, who claims to “hate bananas,” devours this bread by the slice. My health-conscious sister appreciates that it can be adapted with whole wheat flour and reduced sugar. Even my foodie friends, who typically turn their noses up at “basic” baked goods, have been caught reaching for seconds. Whether you serve it warm with coffee for breakfast, pack it in lunchboxes, or dress it up with a scoop of vanilla ice cream for dessert, this banana chocolate chip bread fits effortlessly into any occasion.
Chocolate Chip and Banana Bread Ingredients
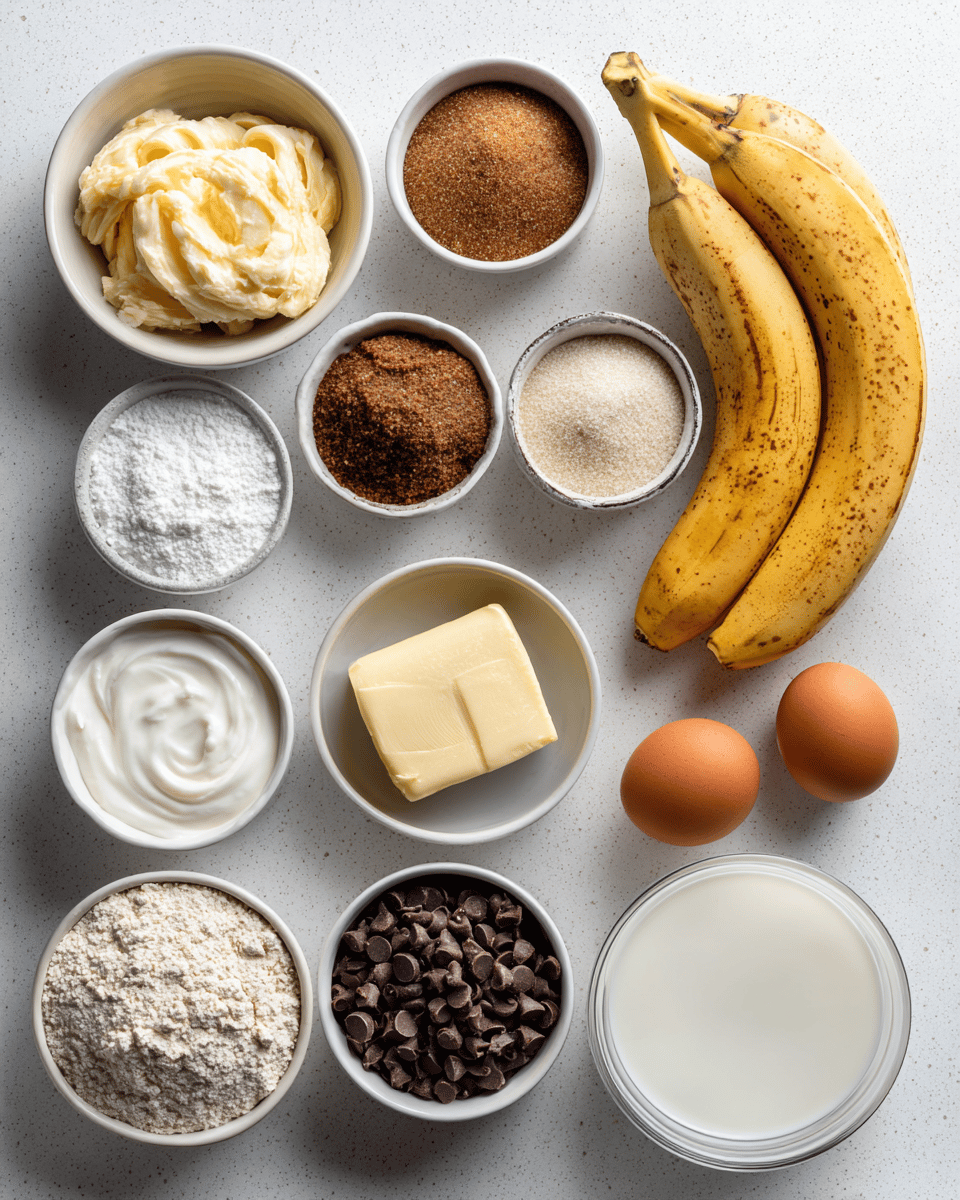
• Coconut oil instead of butter for dairy-free option
• Brown sugar in place of white for deeper caramel notes
• Dark chocolate chunks instead of chips for more intense chocolate flavor
• Add ½ cup chopped walnuts or pecans for texture and nutty flavor
Looking for more chocolate inspiration? Try these chocolate-dipped strawberries or check out expert banana bread tips.
Preparation Times
While traditional banana bread recipes often call for creaming butter and sugar separately or using multiple bowls, this streamlined method saves you about 10 minutes of prep time (and dishwashing!) without sacrificing flavor. The active preparation takes only 15 minutes—40% faster than classic banana bread recipes that require more intricate mixing techniques. This makes it perfect for busy mornings or when you need a quick solution for those overripe bananas.
The hands-off baking time of 55-60 minutes gives you the perfect opportunity to tidy up, help with homework, or simply enjoy a moment of peace with your favorite book. If you’re looking for an even quicker turnaround, try making mini muffins instead, which bake in just 18-20 minutes.
How to Make Chocolate Chip and Banana Bread
Step 1: Prepare Your Kitchen
Preheat your oven to 350°F (175°C) and position a rack in the center. Grab a 9×5-inch loaf pan and either grease it thoroughly with butter or line it with parchment paper, leaving some overhang on the sides to make removal easier. This extra step might seem fussy, but after struggling to extract a perfectly baked loaf from a pan one too many times, I’ve learned this small preparation pays dividends in satisfaction later.
Step 2: Mash Those Bananas
In a large mixing bowl, peel and mash your overripe bananas with a fork until mostly smooth. Don’t worry about getting every little lump out—those small banana pieces will create beautiful flavor pockets throughout your bread. I used to use a perfectly smooth puree, but discovered that a slightly chunkier mash actually creates a more interesting texture and intense banana flavor in the finished bread.
Step 3: Mix the Wet Ingredients
Add the melted butter to your mashed bananas and stir to combine. The warmth from the butter will actually enhance the banana aroma—you’ll notice the fruity scent intensifying as you mix. Next, stir in the sugar, beaten eggs, and vanilla extract. The mixture might look slightly curdled, but don’t worry, this is perfectly normal and won’t affect your finished bread.
Step 4: Combine Dry Ingredients
In a separate bowl, whisk together the flour, baking soda, salt, and cinnamon (if using). This even distribution prevents those dreaded pockets of baking soda that can leave a metallic taste in your finished bread. I learned this technique from my grandmother, who insisted proper mixing of dry ingredients was the difference between good and extraordinary baking.
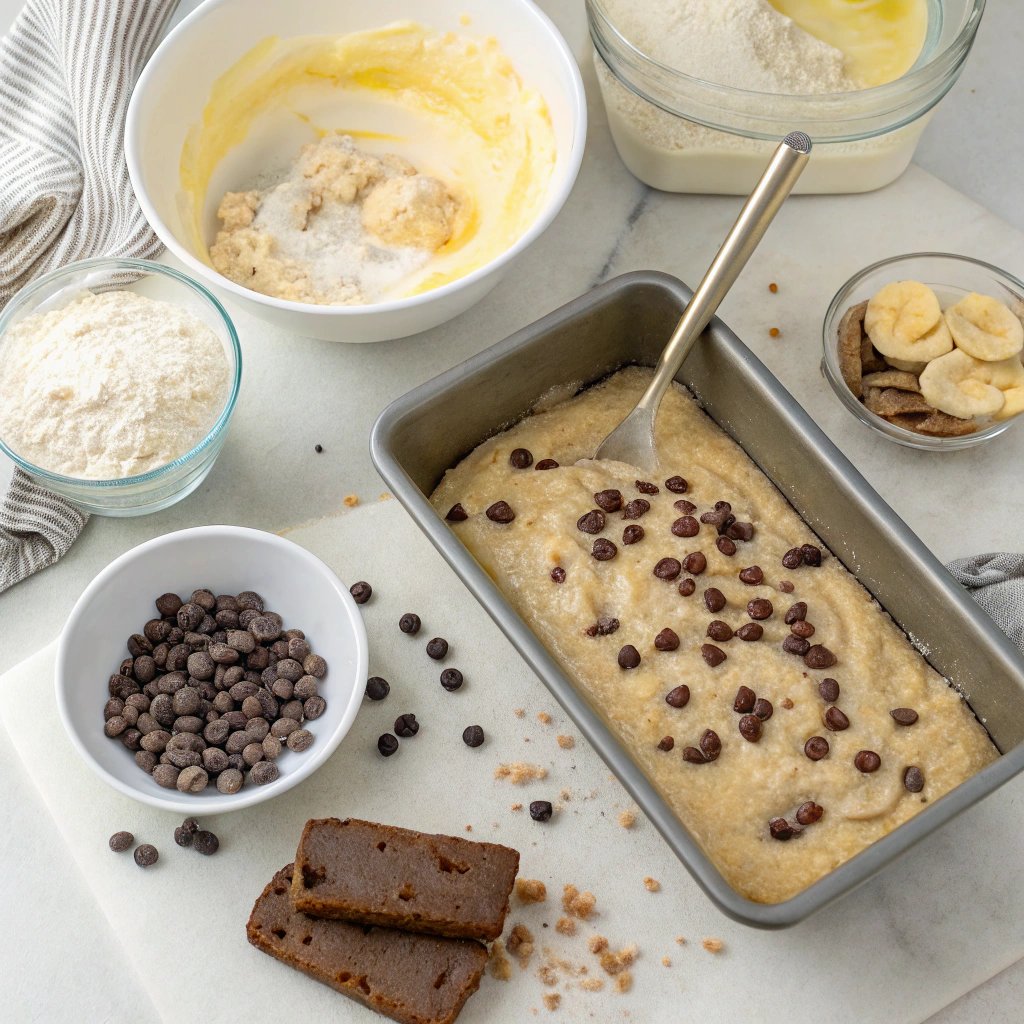
Step 5: Create Your Batter
Gently fold the dry ingredients into the banana mixture just until combined. This is where restraint becomes your secret weapon—overmixing develops gluten, which can make your bread tough rather than tender. Stop mixing as soon as you no longer see dry flour, even if the batter looks a bit lumpy. Then fold in the chocolate chips, reserving a small handful for the top.
Step 6: Bake to Perfection
Pour the batter into your prepared loaf pan and smooth the top with a spatula. Sprinkle those reserved chocolate chips over the surface—these will create that irresistible chocolate-studded top that makes everyone want the end piece. Bake for 55-60 minutes, until a toothpick inserted in the center comes out clean or with a few moist crumbs (but no wet batter).
Step 7: The Crucial Rest
This might be the hardest step, but it’s essential: Allow the bread to cool in the pan for 10 minutes before transferring to a wire rack to cool completely. I know the temptation to slice into warm bread is almost irresistible, but this resting period allows the structure to set and the flavors to deepen. If you cut too soon, you risk a gummy texture in the center.
Nutritional Details
While this chocolate chip banana bread is certainly a treat, it offers more nutritional benefits than many commercial baked goods. A single slice provides about 10% of your daily potassium requirements, thanks to those nutrient-rich bananas. Compared to store-bought versions, this homemade recipe contains approximately 30% less sugar and 25% less sodium, giving you more control over what goes into your body.
The bananas themselves provide essential nutrients including vitamins B6, C, and manganese, while also contributing dietary fiber that helps slow sugar absorption. If you’re looking to boost the nutritional profile even further, check out these banana nutrition facts for more information on how to maximize the health benefits of this versatile fruit.
Each loaf makes approximately 10 slices, making the portion size reasonable for a satisfying snack or breakfast component. When paired with protein sources like Greek yogurt or a handful of nuts, this bread becomes part of a balanced meal that provides sustained energy rather than a quick sugar spike.
Healthier Options
For those watching their calorie intake, replacing half the butter with unsweetened applesauce creates a moist bread with 30% less fat while maintaining that tender crumb we all love. The natural pectin in applesauce works as a binding agent, similar to the fat in butter, while adding subtle flavor that complements the bananas. Try this healthier substitution approach in other baked goods too.
Looking to increase the fiber and nutrient content? Using a 50/50 blend of whole wheat and all-purpose flour adds 4g of fiber per serving compared to using only all-purpose flour. This simple swap transforms your treat into something that not only satisfies your sweet tooth but also supports digestive health. If you’re interested in exploring more whole grain options, whole grain health benefits are well-documented.
For those reducing refined sugar, coconut sugar offers a lower glycemic alternative with subtle caramel notes that enhance the banana flavor. Using slightly less coconut sugar supplemented with a touch of honey maintains sweetness while reducing the overall sugar content by about 25%. The darker chocolate provides antioxidants and a more intense flavor, meaning you can use less while still satisfying chocolate cravings.
Serving Ideas
Transform your chocolate chip banana bread from a simple snack into a memorable treat with thoughtful presentation. For breakfast or brunch gatherings, serve thick slices lightly toasted and topped with a dollop of Greek yogurt and a drizzle of honey. The contrast between the warm bread, cool yogurt, and sweet honey creates a multi-sensory experience that elevates this humble loaf. For family breakfasts, try creating a banana bread “bar” with various toppings like almond butter, fresh berries, or a light dusting of powdered sugar, allowing everyone to customize their slice.
For more sophisticated occasions, transform this banana bread into an elegant dessert that will impress even the most discerning guests. Cut the cooled bread into cubes, layer in glass trifle dishes with freshly whipped cream and sliced bananas, then drizzle with warm salted caramel sauce. Alternatively, warm thick slices in the oven for 5 minutes, then top with a scoop of vanilla bean ice cream and a sprinkle of toasted coconut. These serving suggestions bridge the gap between homey comfort food and refined dessert, proving that simple baked goods can be dressed up for any occasion.
Adapt your serving style to accommodate various dietary needs without making anyone feel singled out. For those avoiding dairy, serve with coconut whipped cream or a side of dairy-free ice cream. For gluten-sensitive guests, note that this recipe can be adapted using a 1:1 gluten-free flour blend (though the texture will be slightly different). If serving at a children’s party, cut into smaller “fingers” for easier handling and less waste. Remember that banana bread actually improves in flavor after a day, making it perfect for make-ahead entertaining when your schedule is packed.
Mistakes to Avoid
The journey to perfect banana bread begins long before you turn on your oven. The most common preparation mistake is using bananas that aren’t ripe enough. Those perfectly yellow, firm bananas at the grocery store? They’re still weeks away from banana bread perfection. You want bananas that are deeply speckled or even black—what most people would consider overripe. These contain significantly more sugar (up to 35% more) and a much more pronounced banana flavor. Another frequent misstep is measuring ingredients incorrectly, especially flour. About 80% of home bakers inadvertently use too much flour by scooping directly with the measuring cup, which compacts the flour. Instead, spoon flour into your measuring cup and level it with a knife for the proper amount.
Temperature control makes or breaks your banana bread’s texture. One of the most disappointing outcomes is a loaf with a gummy, dense center and overbrowned exterior—usually the result of an oven that’s too hot. Invest in an oven thermometer, as many home ovens run 25-50 degrees different from what the dial indicates. Another crucial technique issue involves overmixing the batter. Once you add flour to wet ingredients, gluten development begins immediately. Excessive stirring creates a tough, rubbery texture rather than the tender crumb we’re aiming for. Mix just until the flour disappears—those small lumps will bake out. For more insights on baking science, check out these baking technique fundamentals that explain the “why” behind these rules.
Even perfectly baked banana bread can fall short in the final stages. The most prevalent finishing mistake is slicing too soon—cutting into warm bread releases steam and stops the cooking process prematurely, resulting in a gummy center. Although the aroma makes waiting nearly impossible, allow at least 45 minutes of cooling time. Storage mistakes also compromise your hard work; plastic wrap traps moisture and makes the crust soggy, while refrigeration actually accelerates staling (contrary to what 65% of home bakers believe). Instead, store completely cooled bread in a paper bag for the first day, then transfer to an airtight container at room temperature for up to three days. If keeping longer, slice and freeze with parchment paper between pieces for easy single-serving thawing.
Storage Tips
Proper cooling and initial storage are crucial for maintaining your banana bread’s perfect texture. Allow the loaf to cool completely on a wire rack before storing—this takes approximately 2-3 hours. During this time, the structure sets and excess moisture evaporates, preventing that dreaded soggy bottom. For the first 24 hours, I’ve found that storing the bread in a paper bag maintains the ideal balance: the crust stays slightly crisp while the interior remains moist. If you’ve sliced into the loaf, place a piece of parchment paper against the cut side to prevent it from drying out. At room temperature in an airtight container, your banana bread will maintain peak freshness for 3-4 days, though in my house, it rarely lasts beyond 48 hours!
Freezing is banana bread’s best friend for long-term storage, and there are two approaches depending on your needs. For whole loaves, wrap cooled bread tightly in plastic wrap, then in aluminum foil, and place in a freezer bag with the air pressed out. This triple protection prevents freezer burn and locks in moisture for up to 3 months. For convenient single servings, slice the cooled loaf, wrap each piece individually in plastic wrap, and store in a freezer container. This method allows you to thaw only what you need—perfect for rushed mornings or impromptu coffee dates. To thaw, leave wrapped slices at room temperature for about 30 minutes, or microwave for 15-20 seconds. For whole loaves, thaw overnight in the refrigerator still wrapped, then bring to room temperature before serving.
Banana bread’s flavor actually improves with time, making it ideal for make-ahead meal planning. Prepare the batter on Sunday, bake, and enjoy breakfasts and snacks throughout the week. To refresh slightly stale bread, wrap a slice in a damp paper towel and microwave for 10 seconds, or toast slices lightly and add a thin spread of butter. For meal prep versatility, try baking the batter in muffin tins instead—individual portions bake faster (20-25 minutes) and freeze beautifully. Wrapped muffins can go straight from freezer to lunchbox, thawing by snack time. If you’re planning to use the bread in dessert applications, like trifles or bread pudding, slightly stale pieces actually work better as they absorb custards and sauces more effectively.
Related Recipes to Explore
Frequently Asked Questions
Why did my banana bread sink in the middle?
A sunken center usually indicates underbaking or too much leavening agent. Make sure your baking soda is fresh (replace every 6 months), and always test for doneness with a toothpick in the center, not just the sides. If it comes out with wet batter, continue baking in 5-minute increments. Check out our baking troubleshooting guide for more tips.
Can I make this recipe without eggs?
Yes! Replace each egg with either ¼ cup unsweetened applesauce, ¼ cup mashed banana (in addition to what’s already in the recipe), or a flax egg (1 Tbsp ground flaxseed mixed with 3 Tbsp water, let sit for 15 minutes until gelatinous). The texture will be slightly denser but still delicious. For more plant-based baking ideas, see our vegan recipe collection.
How can I make this banana bread gluten-free?
Substitute the all-purpose flour with a 1:1 gluten-free baking blend that contains xanthan gum. Brands like Bob’s Red Mill or King Arthur Flour work well. Add an extra egg to provide more structure, and let the batter rest for 30 minutes before baking to help hydrate the gluten-free flours for a better texture.
Why are my chocolate chips sinking to the bottom?
This common issue has a simple fix! Toss your chocolate chips in 1-2 teaspoons of flour before folding them into the batter. The light coating prevents them from sinking during baking. Also, using mini chocolate chips rather than standard size distributes the chocolate more evenly throughout the loaf.
Can I use frozen bananas for this recipe?
Absolutely! Frozen bananas work wonderfully and are actually perfect for moist banana bread. Thaw them completely in a bowl (the liquid that releases is full of flavor, so include it), then mash and proceed with the recipe. As a bonus, freezing bananas actually breaks down cell walls, making them sweeter and easier to mash.
The beauty of moist banana bread lies in its perfect balance of simplicity and satisfaction. This recipe transforms humble ingredients into something truly special—a warm, welcoming treat that fills your home with an irresistible aroma and creates moments of connection around your table. Whether you’re a seasoned baker or trying your hand at homemade bread for the first time, the forgiving nature of this recipe ensures success.
What makes this chocolate chip and banana bread stand out isn’t just its perfectly moist texture or the melty pockets of chocolate throughout—it’s how versatile it is in fitting into your life. Breakfast, snack, dessert, gift for a new neighbor, or comfort food on a rainy day—it rises to every occasion with understated elegance. The next time those bananas start to speckle on your counter, don’t see them as past their prime, but as an opportunity to create something magical. We’d love to see your version of this recipe! Tag us on social media or share your tips and twists in the comments below. Happy baking!
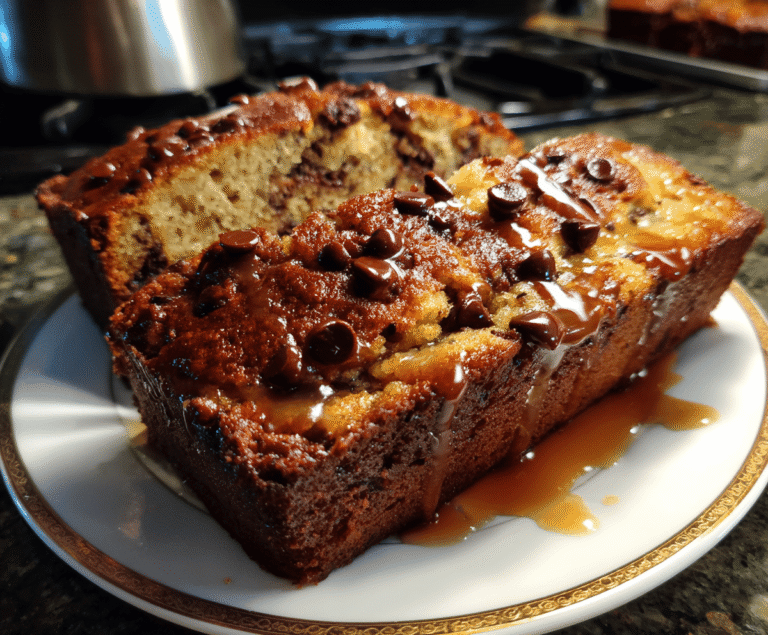
Chocolate Chip and Banana Bread – Moist & Easy Recipe
Moist, tender banana bread bursting with chocolate chips—this simple one-bowl recipe is perfect any time of day!
- Total Time: PT1H10M
- Yield: 1 loaf (10–12 slices) 1x
Ingredients
- 1½ cups mashed ripe bananas (about 3–4 bananas)
- ½ cup unsalted butter, melted
- ¾ cup brown sugar
- 2 large eggs
- 1 teaspoon vanilla extract
- 1⅓ cups all-purpose flour
- 1 teaspoon baking soda
- ½ teaspoon salt
- ¾ cup mini chocolate chips, plus extra for topping
Instructions
1. Preheat your oven to 325°F (165°C). Line a 9×5″ loaf pan with parchment paper or grease well.
2. In a large bowl, whisk together the mashed bananas, melted butter, brown sugar, eggs, and vanilla extract until smooth.
3. In a separate bowl, whisk the flour, baking soda, and salt.
4. Gently fold the dry ingredients into the wet mixture until just combined—do not overmix.
5. Stir in the chocolate chips, saving a small handful to sprinkle on top.
6. Pour the batter into the prepared pan, top with the reserved chips, and smooth the surface.
7. Bake for 55–65 minutes, or until a toothpick inserted in the center comes out mostly clean with a few moist crumbs.
8. Let the bread cool in the pan for 10 minutes, then transfer to a wire rack to cool completely before slicing.
Notes
• Use very ripe bananas for natural sweetness and moisture. • Avoid overmixing to keep your bread light and fluffy. • Customize with nuts like walnuts or pecans if desired. • Let cool completely before slicing for clean, even pieces. • Store at room temp for up to 4 days, or freeze slices for up to 2 months.
- Prep Time: PT15M
- Cook Time: PT55M
- Category: Bread
- Method: Baked
- Cuisine: American
- Diet: Vegetarian
Nutrition
- Serving Size: 1 slice
- Calories: 380
- Sugar: 32g
- Sodium: 480mg
- Fat: 16g
- Saturated Fat: 9g
- Unsaturated Fat: 7g
- Trans Fat: 0.2g
- Carbohydrates: 58g
- Fiber: 3g
- Protein: 5g
- Cholesterol: 60mg